Prerequisites
You will need a basic understanding of HTML, CSS and vanilla Javascript.
Aim of the Article
The aim of this article is to introduce you to the following concepts by building a small extension that can change any web page’s background colour based on user input:
- Basics of working with extensions
- Popup
- Content Script
- Communicating between the two
Instructions
Step 1: Initialization
Create your Chrome Extension project’s directory and inside, create a manifest.json file. This file will be used to declare information about your extension and register a popup component and a content script.
Put the following configuration in the manifest.json file:
{
  "manifest_version": 3,
  "name": "Background Colour Changer",
  "version": "1.0",
  "permissions": [],
  "action": {
    "default_popup": "popup/popup.html"
  },
  "host_permissions": ["<all_urls>"]
}
Currently, the most important info to note is the name, which will be displayed in various places on the browser and the “default_popup” field, which registers a popup HTML file that will be created in the next step.
If you wish to learn more about the manifest file, take a look at the previous article [<TODO: INSERT LINK HERE>]
Step 2: Popup View
2.1 Create a directory called “popup” and inside, create 3 files:
- popup.html
- popup.css
- popup.js
2.2 Inside the HTML file, add the following code:
<!DOCTYPE html>
<html lang="en">
<head>
<meta charset="UTF-8">
<title>Background Color Changer</title>
<link rel="stylesheet" type="text/css" href="popup.css">
<script src="popup.js"></script>
</head>
<body>
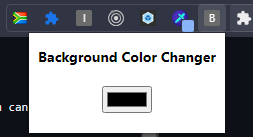
<div id="container">
<h3 id="title">Background Color Changer</h3>
<input type="color" id="color-picker">
</div>
</body>
</html>The popup consists of a title and a colour picker input and imports the CSS and Javascript files.
2.3 In the CSS file, add the following styles:
#container {
    min-width: 180px;
}

#title {
    text-align: center;
}

input {
    display: block;
    margin: 20px auto;
}
2.4 Load and test the extension
To load the extension onto the browser, navigate to your browser’s extensions page (eg; chrome://extensions). Enable developer mode in the top right hand corner and then click the “Load Unpacked” button in the top left corner and select the root folder of your project.
You will see a card with your extension’s name on it. When making changes to the extension, you will need to reload it before the changes take affect.
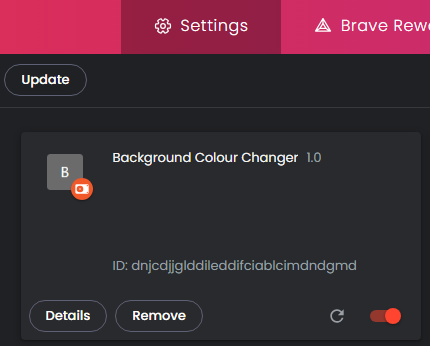
To view the popup, pin the extension in the top right corner of the browser and click on the extension’s icon.
Step 3: Changing the Page Background Colour
In order to change the background of the currently viewed page we will need a Content Script. A Content Script is a Javascript file that is inserted into the currently viewed page and is able to access the DOM to make structural and styling changes.
[<TODO: Link First Aricle on Content Scripts>]
The popup will communicate to the Content Script by sending a message when the user changes the colour on the colour picker input. The content script will listen for these messages and execute the appropriate code.
3.1 Create and Register Content Script
Create the content-script.js file in the root of the project and register the script by adding the following to the root of the manifest.json file:
"content_scripts": [
    {
      "js": ["content-script.js"],
      "matches": ["https://*/*", "http://*/*"]
    }
]
The patterns defined under the “matches” key allow the Content Script to run on any page.
3.1 Listen for Colour Change Messages
Create the content-script.js file in the root of the project and add the following code to it.
console.log('[Background Colour Changer] Content Script Loaded');

chrome.runtime.onMessage.addListener(function (message) {
    console.log('[Background Colour Changer] Content Script - Message received', message);

    document.body.style.backgroundColor = message.color;
});
The above code calls chrome.runtime.onMessage.addListener() to register code that will be called every time a message is sent. When a message is received, the background colour of the current page is set to the color value provided by the message.
Console logs are made for debugging purposes. Since the Content Script runs on the current web page, you will be able to see these logs from the current web page’s console.

3.2 Send Colour Change Message
When the value of the colour picker on the popup is changed, a message with the new colour will need to be sent.
Add the following code to the currently empty popup.js file:
document.addEventListener("DOMContentLoaded", function () {
    const colorPicker = document.getElementById("color-picker"); // 1

    colorPicker.addEventListener("change", async function () { // 2
        const [tab] = await chrome.tabs.query({ active: true, lastFocusedWindow: true }); // 3
        const message = { type: 'COLOR_CHANGE', color: colorPicker.value };

        console.log('Popup - Sending Message', message);
        await chrome.tabs.sendMessage(tab.id, message); // 4
    });
});
Once the DOM is loaded and the Colour Picker is rendered, the following happens:
- The DOM is queried to get a reference to the Colour Picker input
- Changes on the Colour Picker are listened for
- The current webpage/tab is queried using the
chrome.tabsAPI so that a message can be sent to the Content Script on that tab - The message, containing any required info (in this case, the new colour) is sent to the tab, using the active tab’s id
Console logs are made for debugging purposes. You will be able to see these logs by inspecting the popup and looking at its console.
3.3 Test Changes
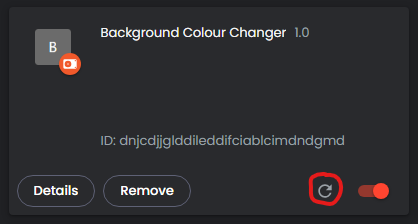
Reload the extension by navigating to your browser’s extensions page (eg; chrome://extensions), locate the card for the extension and click the reload button.
Next, open the browser popup, select a colour and click off the colour picker. You should now see the background colour of the currently viewed page change to the colour you selected.
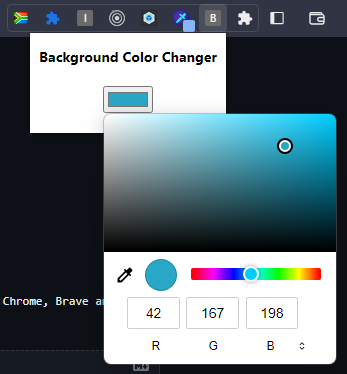
If your implementation did not work, check the console of the webpage and popup for any errors.